How to Get Better at Fading Hair

TheCraft Barber EducationUpdated 5 min read

Short answer

To get better at fading, stop focusing only on learning more guard formulas and start improving both your technique and your ability to diagnose what you see. Use a repeatable system, understand what each guard and lever position does, work in controlled sections, study head shape and growth patterns, photograph your finished cuts, and review exactly where your blends break down.

Better fades come from better diagnosis

Knowing how to move a clipper is only part of fading.

You also need to recognize:

  • Where a transition is too heavy
  • Where you’ve created a light spot
  • Whether a line is actually excess length
  • How head shape changes the blend
  • How density affects darkness
  • How growth direction changes cutting
  • When to keep working
  • When to stop

That visual judgment develops through deliberate practice.
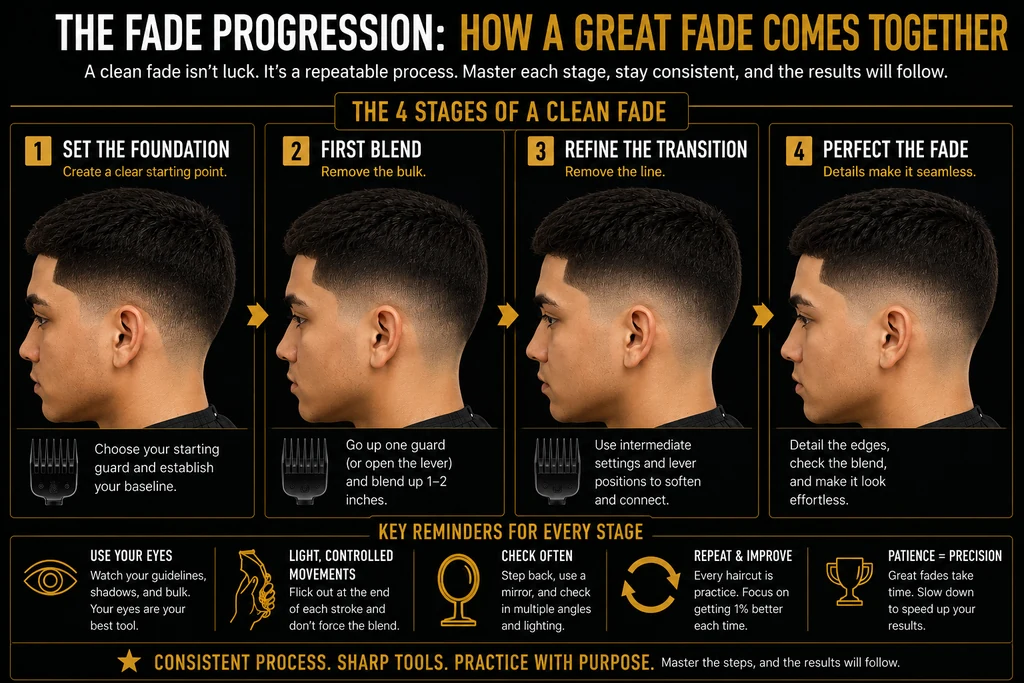
TheCraft visual titled The fade progression: how a great fade comes together, showing the four stages of building a clean fade on the same head from establishing the foundation through refining and finishing, and reinforcing that a clean fade is not luck but a repeatable process you master one stage at a time. Stage one, set the foundation, creates a clear starting point: choose your starting guard and establish your baseline. Stage two, first blend, removes the bulk: go up one guard or open the lever and blend up one to two inches. Stage three, refine the transition, removes the line: use intermediate settings and lever positions to soften and connect. Stage four, perfect the fade, is where details make it seamless: detail the edges, check the blend, and make it look effortless. Key reminders for every stage: use your eyes to watch your guidelines, shadows, and bulk; keep movements light and controlled, flicking out at the end of each stroke instead of forcing the blend; check often by stepping back and using a mirror across multiple angles and lighting; repeat and improve, treating every haircut as practice aimed at getting one percent better; and remember that patience equals precision, because great fades take time and slowing down speeds up your results. Key takeaway: a consistent process, sharp tools, and practice with purpose are what make the results follow.View full size

1. Build a repeatable system

Don’t reinvent your entire process on every haircut.

Develop a basic fading workflow that you understand and can repeat.

Your system should help you know:

  • Where you’re establishing the fade
  • What lengths you’re creating
  • Which transitions need to be connected
  • What tool you normally use for each transition
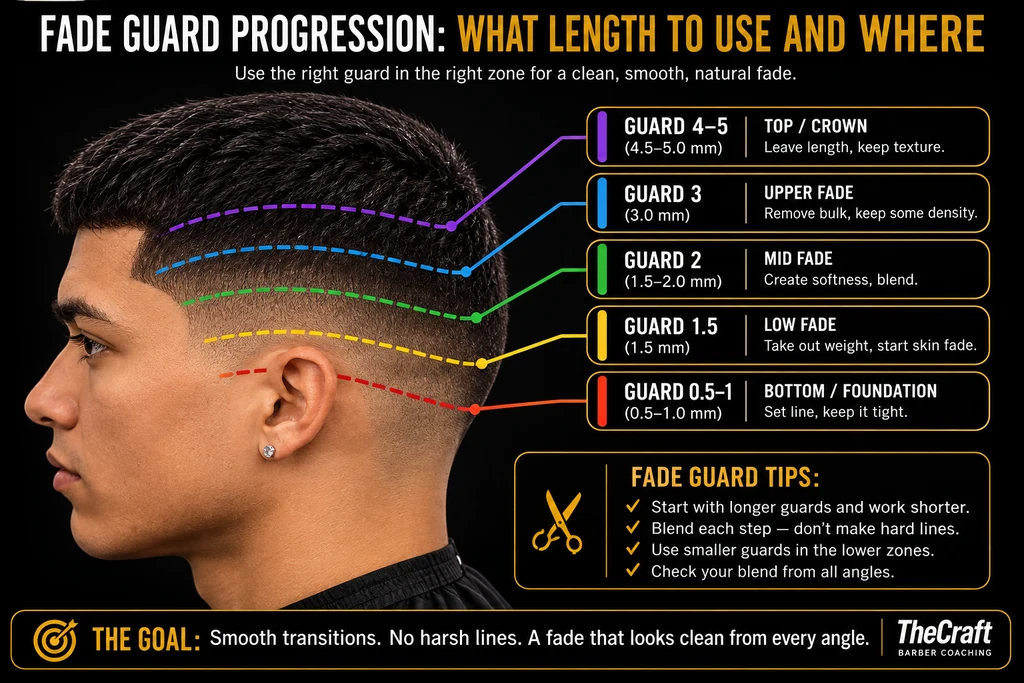
TheCraft diagram titled Fade guard progression: what length to use and where, showing how to use the right guard in the right zone for a clean, smooth, natural fade. A side profile of a finished fade is marked with five coloured dashed guidelines that map each zone of the head from the crown down to the hairline. Purple marks the top and crown, cut with guard four to five, about 4.5 to 5.0 millimetres: leave length and keep texture. Blue marks the upper fade, cut with guard three, about 3.0 millimetres: remove bulk but keep some density. Green marks the mid fade, cut with guard two, about 1.5 to 2.0 millimetres: create softness and blend. Yellow marks the low fade, cut with guard one and a half, about 1.5 millimetres: take out weight and start the skin fade. Red marks the bottom or foundation, cut with guard one half to one, about 0.5 to 1.0 millimetres: set the line and keep it tight. The zones sit progressively higher up the head as the guard gets longer, so the shortest lengths stay nearest the hairline and the longest length stays on top. Fade guard tips listed alongside: start with longer guards and work shorter; blend each step and don’t make hard lines; use smaller guards in the lower zones; and check your blend from all angles. The stated goal: smooth transitions, no harsh lines, and a fade that looks clean from every angle.View full size

Once you have consistency, troubleshooting becomes easier.

If something goes wrong, you can identify which part of the process produced it.

2. Understand your tools instead of memorizing them

Learn your clipper.

Learn your guards.

Learn how much difference you actually see between closed, partially open, and open positions.

Learn how your trimmer behaves.

Learn which guards feed different hair textures well.

The better you understand your equipment, the less you’ll depend on somebody else’s exact formula.
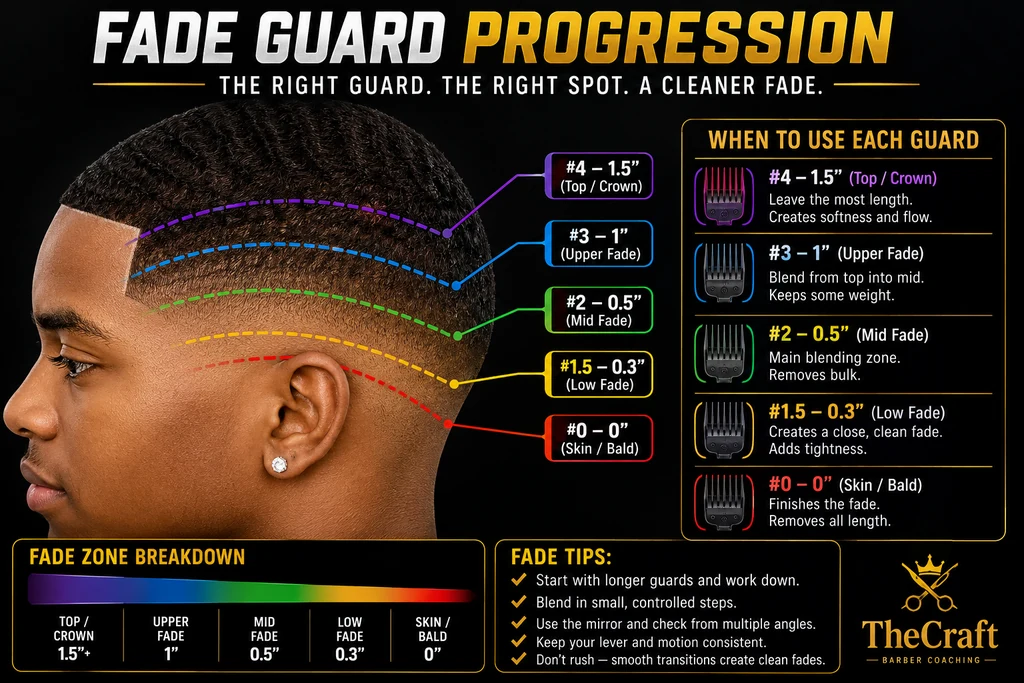
TheCraft reference chart titled Fade guard progression, with the subtitle the right guard, the right spot, a cleaner fade. A side profile of a finished fade is marked with five coloured dashed guidelines: purple for the number four guard at 1.5 inches on the top and crown, blue for the number three guard at 1 inch on the upper fade, green for the number two guard at 0.5 inches on the mid fade, yellow for the number one and a half guard at 0.3 inches on the low fade, and red for the number zero guard at 0 inches for skin or bald. A panel headed when to use each guard explains the purpose of every length. The number four guard at 1.5 inches on the top and crown leaves the most length and creates softness and flow. The number three guard at 1 inch on the upper fade blends from the top into the mid section and keeps some weight. The number two guard at 0.5 inches on the mid fade is the main blending zone and removes bulk. The number one and a half guard at 0.3 inches on the low fade creates a close, clean fade and adds tightness. The number zero guard at 0 inches finishes the fade and removes all length. A fade zone breakdown strip shows the lengths shortening in order along a colour gradient: top and crown at 1.5 inches and above, upper fade at 1 inch, mid fade at 0.5 inches, low fade at 0.3 inches, and skin or bald at 0 inches. Fade tips listed alongside: start with longer guards and work down; blend in small, controlled steps; use the mirror and check from multiple angles; keep your lever and motion consistent; and don’t rush, because smooth transitions create clean fades.View full size

3. Stop rushing through guidelines

If your fading system uses guidelines, make them intentional.

Know:

  • Why you created the guideline
  • Approximately how much space you’re giving yourself
  • Which tool will remove it
  • Whether it is actually gone before moving on

Leaving several unfinished transitions and hoping to clean everything up at the end can make troubleshooting harder.

4. Use consistent sections

If one side of your fade occupies a narrow section and the other stretches much higher, the haircut can look unbalanced even if each individual section is blended.

Use visual landmarks on the head to help control your shape.

Don’t blindly follow the skull upward with the clipper.

5. Learn head anatomy

The head isn’t flat.

Pay attention to areas such as:

  • Parietal ridge
  • Occipital area
  • Temples
  • Crown
  • Nape

Understanding where the head curves, protrudes, or recedes helps explain why the same technique doesn’t produce the same visual result everywhere.

6. Learn to recognize density and growth patterns

A great barber doesn’t fight every natural characteristic of the client’s hair.

Look for:

  • Changes in density
  • Cowlicks
  • Whorls
  • Hair growing forward
  • Hair growing backward
  • Hair growing diagonally
  • Sparse areas

Work with what is actually on the head.

7. Step back from the haircut

This simple habit can improve your work immediately.

During the haircut, periodically move back and look at the entire fade.

Ask:

  • Is the shape balanced?
  • Is one side higher?
  • Where does my eye naturally go?
  • Is there a visible band?
  • Is there an isolated light area?

Close-up vision helps with detail.

Distance helps with the overall haircut.

You need both.
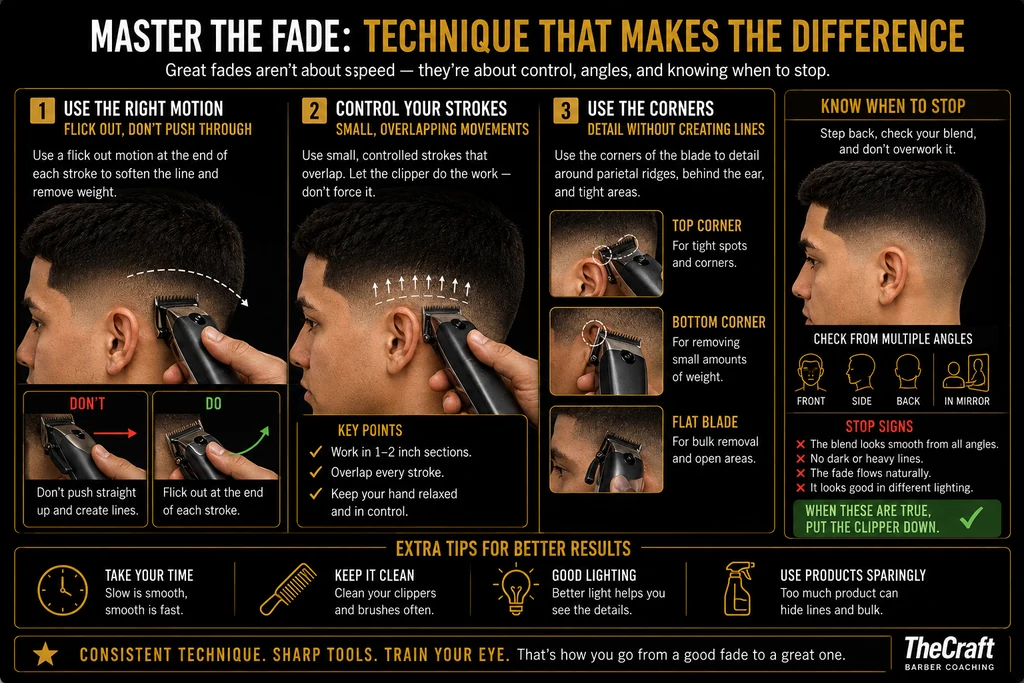
TheCraft guide titled Master the fade: technique that makes the difference, with the subtitle that great fades aren’t about speed — they’re about control, angles, and knowing when to stop. Step one, use the right motion: flick out, don’t push through. Use a flick out motion at the end of each stroke to soften the line and remove weight. A photo shows a barber running clippers up the side of a fade with a curved dashed arrow flicking away from the head at the end of the stroke. A don’t example, marked with a straight red arrow, shows pushing straight up and creating lines. A do example, marked with a curved green arrow, shows flicking out at the end of each stroke. Step two, control your strokes: small, overlapping movements. Use small, controlled strokes that overlap, and let the clipper do the work instead of forcing it. A photo shows a row of short upward arrows tracking overlapping passes along the fade line. Key points: work in one to two inch sections, overlap every stroke, and keep your hand relaxed and in control. Step three, use the corners: detail without creating lines. Use the corners of the blade to detail around parietal ridges, behind the ear, and tight areas. The top corner is for tight spots and corners, the bottom corner is for removing small amounts of weight, and the flat blade is for bulk removal and open areas, each shown in a close-up photo of the blade angled against the head. A final panel, know when to stop, advises stepping back, checking your blend, and not overworking it, beside a photo of a finished fade in profile. Check from multiple angles: front, side, back, and in mirror. Stop signs that mean the fade is done: the blend looks smooth from all angles, there are no dark or heavy lines, the fade flows naturally, and it looks good in different lighting. When these are true, put the clipper down. Extra tips for better results: take your time, because slow is smooth and smooth is fast; keep it clean by cleaning your clippers and brushes often; use good lighting, because better light helps you see the details; and use products sparingly, because too much product can hide lines and bulk. The closing line reads consistent technique, sharp tools, train your eye — that’s how you go from a good fade to a great one.View full size

8. Use your mirror

A mirror changes your visual perspective and can make imbalances easier to notice.

Check the silhouette and fade from the mirror rather than relying exclusively on your normal cutting position.

9. Photograph your finished cuts

Take consistent photos when possible:

  • Similar lighting
  • Similar distance
  • Clean background
  • Multiple angles

At minimum, useful views often include the left side, right side, and back, with additional views when necessary.

The purpose isn’t only social media.

Photos give you a record of your work.

10. Critique your haircut after the client leaves

Don’t just decide:

“That fade was good.”

Ask specific questions.

  • Where is the strongest part of the blend?
  • Where is the weakest?
  • Did I leave weight?
  • Did I create any light areas?
  • Are both sides visually balanced?
  • Did I control the fade height?
  • What took me the longest?
  • What would I do differently next time?

That turns every haircut into practice.

11. Work on one weakness at a time

If you’re struggling with five things, don’t attempt to consciously fix all five during your next haircut.

Pick one.

For example:

  • “Today I’m going to control my guideline width.”
  • “I’m going to focus on not pushing the fade too high.”
  • “I’m going to step back every few minutes and evaluate the overall shape.”

Focused practice is easier to measure.

12. Track whether you’re actually improving

Improvement can be difficult to notice day to day.

Compare your work over time.

Look for changes in:

  • Blend consistency
  • Fade height
  • Dark spots
  • Weight lines
  • Symmetry
  • Shape
  • Time
  • Confidence diagnosing problems

Your goal isn’t merely to cut more heads.

It’s to learn from the heads you’re already cutting.

Don’t chase perfection

You’re going to have cuts where the hair doesn’t behave like the tutorial.

That’s normal.

Different clients bring different:

  • Head shapes
  • Density
  • Texture
  • Growth patterns
  • Hairlines
  • Previous haircuts

The goal isn’t to make every head respond identically.

The goal is to become better at adapting your technique to the head in front of you.

Key takeaway

  • Getting better at fading isn’t about finding one secret guard sequence.
  • Build a repeatable process.
  • Understand your equipment.
  • Train your eye.
  • Study the head.
  • Review your finished work.
  • Identify specific weaknesses.
  • Then deliberately work on those weaknesses during future cuts. That’s how repetition turns into improvement.

Frequently asked questions

How long does it take to get good at fading?

There isn’t a universal timeline. Improvement depends on how often you cut, the variety of hair you work with, the quality of your practice, and whether you review and learn from your mistakes rather than simply repeating the same process.

What’s the best fade method for beginners?

A structured, repeatable system is useful because it helps you understand what each stage is supposed to accomplish. There are multiple successful fading systems, so focus on understanding the purpose of each step rather than believing one sequence is the only correct method.

Why are my fades inconsistent?

Inconsistency can come from changing your process, section widths, pressure, fade height, guard selection, lever control, growth patterns, density, or failing to evaluate the haircut as you work. A repeatable process makes the source easier to identify.

How can I practice fading more effectively?

Choose one specific skill to improve, use a repeatable process, photograph your finished work, critique it afterward, and compare your results over time.

Should I copy another barber’s guard system?

Learning another barber’s system can give you structure, but understand why each step works. Clippers, guards, clients, textures, and barber techniques differ. Eventually you should be able to adapt rather than depend entirely on a memorized formula.

Related guides