Why does a fade look patchy?
A clean fade creates the appearance of a gradual transition.
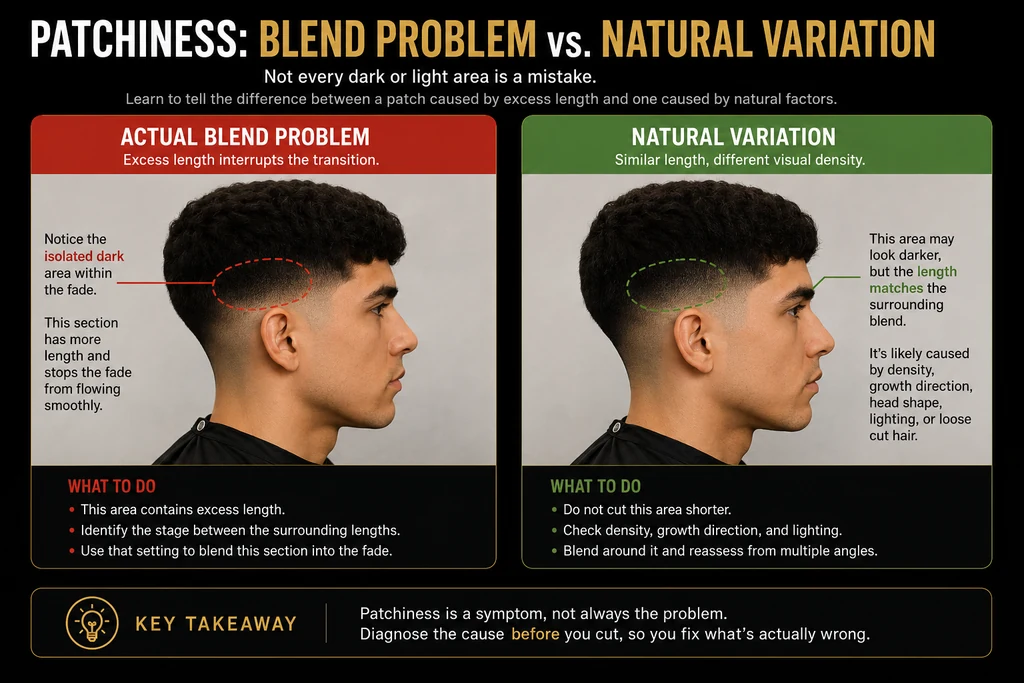
When isolated dark or light areas interrupt that transition, the haircut can appear patchy.
The challenge is figuring out why.
Not every patch is caused by poor blending.
Common causes include:
- Incomplete blending
- Uneven clipper pressure
- Inconsistent section widths
- Hair density
- Growth patterns
- Head shape
- Shadows and lighting
- Loose hair sitting on the scalp
- Natural differences in scalp visibility
Learning to distinguish these is a major part of becoming better at fading.
 View full size
1. Check the hair before blaming your technique
Brush the area thoroughly.
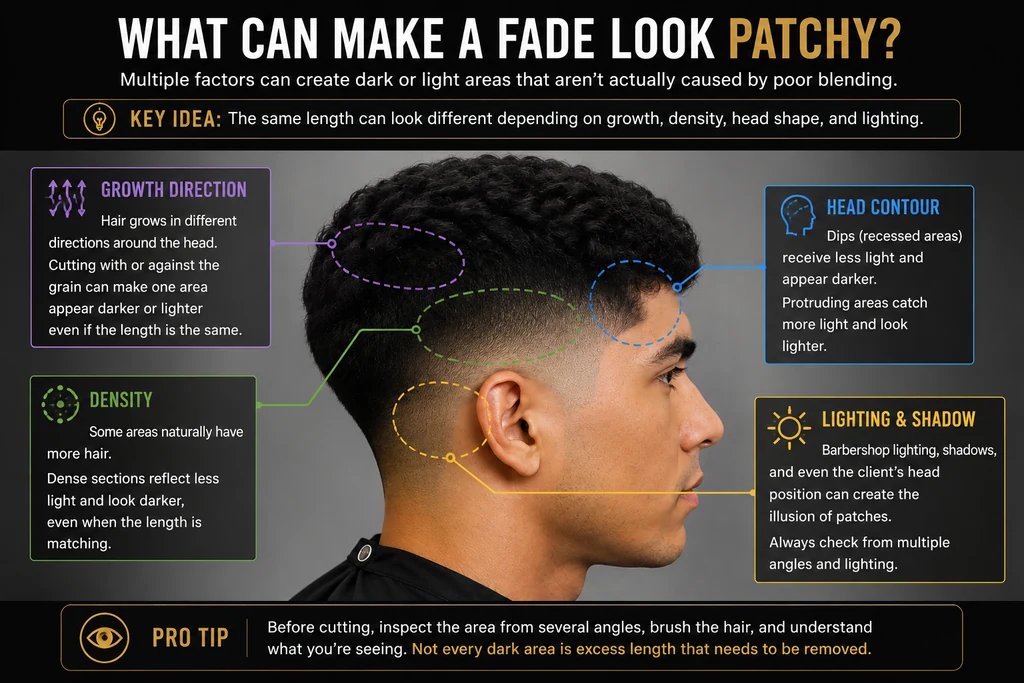
Hair clippings sitting against the scalp can create false darkness.
Then view the haircut from several positions.
If the patch changes dramatically as you move the client or change the lighting, you may be looking at a shadow or density difference rather than excess length.
2. Compare the patch with the surrounding blend
Look at the hair immediately above, below, and beside the problem.
Does the questionable area actually contain more length?
If it does, determine which stage of your fading system should address it.
Avoid jumping directly to your shortest guard.
Use the setting that bridges the surrounding lengths.
3. Watch your clipper pressure
Pressing harder doesn’t necessarily blend better.
Inconsistent pressure can make one section shorter than another and contribute to a spotted appearance.
Try to maintain consistent blade contact and controlled movement.
As you move into longer hair, allow your stroke to leave the head rather than following the head shape indefinitely upward.
4. Pay attention to growth direction
Hair doesn’t always grow straight down.
Around the crown, temples, behind the ears, and back of the head, direction can change significantly.
Cutting against the grain may remove hair differently than cutting across or with the growth pattern.
Comb or brush the hair in several directions to understand what you’re actually seeing.
5. Account for density
A client may naturally have more hair in one section.
That can make one area appear darker even when the physical length is similar.
Trying to make a naturally dense section match a less-dense section purely by cutting it shorter can create an actual hole in the fade.
Your job is to create visual balance while respecting the hair you’re working with.
6. Check the head shape
Dips and protrusions affect light.
A recessed area can appear darker because it receives less light.
A prominent area can appear lighter.
Before repeatedly cutting a stubborn patch, run your comb and hand over the area and look at the head from another angle.
 View full size
How to fix a patch that is actually part of the blend
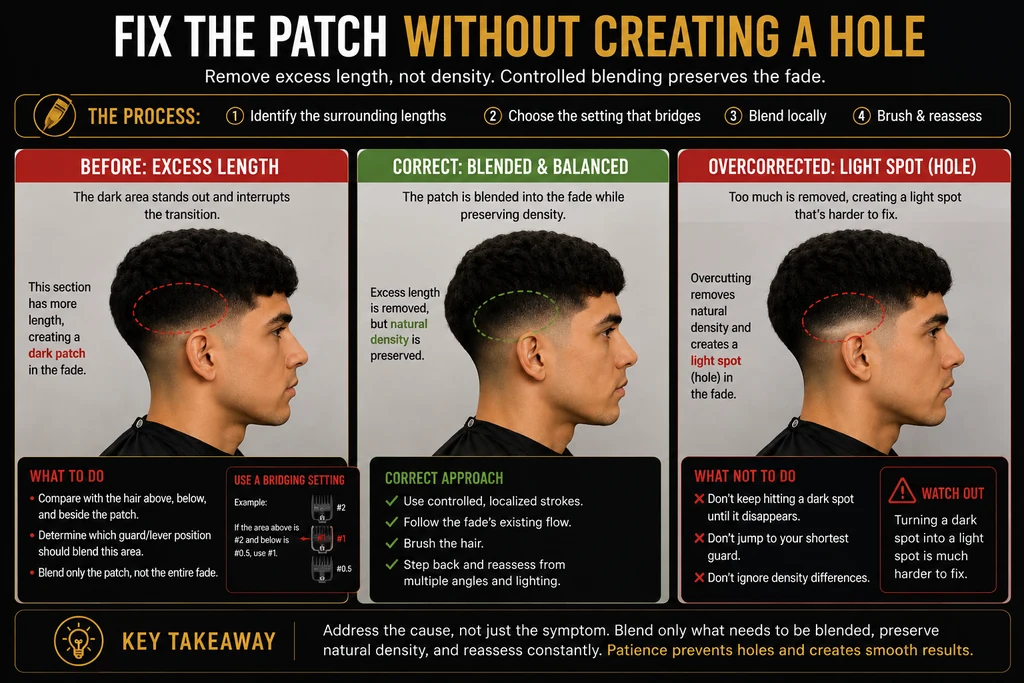
If you’ve determined the patch contains excess length:
- 1
Identify the lengths surrounding it.
- 2
Choose the guard or lever position that bridges those lengths.
- 3
Use controlled, localized strokes rather than widening the entire fade.
- 4
Brush the hair.
- 5
Step back and reassess.
- 6
Only move to a more aggressive setting if you have confirmed that additional length needs to be removed.
 View full size
Avoid creating holes
When a barber sees one dark spot, there’s a temptation to keep hitting it until it disappears.
Watch out
That’s dangerous. You can turn a natural density difference into a light spot, which may be much harder to visually correct.
Make a few deliberate passes and reassess.
Don’t let frustration dictate your clipper work.
Compare both sides — but don’t expect perfect symmetry
Use the opposite side of the haircut as a reference, especially for fade height and overall shape.
But remember that heads and hair growth are rarely perfectly symmetrical.
Your objective is visual balance, not blindly duplicating every clipper movement.
Key takeaway
- Patchiness is a visual symptom, not a diagnosis.
- Before cutting, determine whether you’re seeing excess length, inconsistent technique, density, growth direction, head shape, loose hair, or lighting.
- The better your diagnosis becomes, the less likely you are to overcorrect the haircut.
Frequently asked questions
Why does my fade look blotchy?
Blotchiness can come from uneven blending, inconsistent clipper work, differences in density, growth patterns, head shape, lighting, or loose hair. Inspect the area before automatically cutting it shorter.
Why is one side of my fade darker?
The two sides of a head can have different density, growth patterns, contours, and lighting. Compare fade height and transitions, but don’t assume identical clipper passes will always produce identical visual results.
Can lighting make a fade look bad?
Yes. Directional or harsh lighting can exaggerate shadows and density changes. Check the haircut from multiple angles and, when possible, under more than one lighting position.
How do I avoid making holes in a fade?
Use conservative guard and lever choices, make controlled passes, brush frequently, and reassess before removing more hair from an isolated dark area.