Fade Guard Guide: What Guards to Use and When

TheCraft Barber EducationUpdated 4 min read

Short answer

Clipper guards help create the gradual changes in length that form a fade. Rather than thinking of each guard as a separate step that must follow one rigid formula, think of guards and lever positions as tools for connecting one length to another. The exact cutting length can vary by clipper and guard system, so learn your equipment and focus on how each setting affects the hair.

Understanding clipper guards

A clipper guard controls how close the blade can cut when the hair enters the guard properly.

As guard size increases, more length is generally left behind.

But there’s an important point for developing barbers:

Why it matters

The number printed on a guard is only part of the system.

Your result also depends on:

  • The clipper
  • Blade type
  • Lever position
  • Guard manufacturer
  • Hair texture
  • Growth direction
  • Pressure and stroke
  • Whether the hair is properly feeding into the guard

Learn the specific tools you use every day.

Common guard progression

Many clipper systems include sizes around:

  • No guard / blade
  • 0.5 or half guard
  • #1
  • 1.5
  • #2
  • #3
  • #4 and above

Exact cutting lengths and naming conventions can vary by manufacturer.

Do not assume every company’s #1, half guard, blade, or lever range behaves identically.
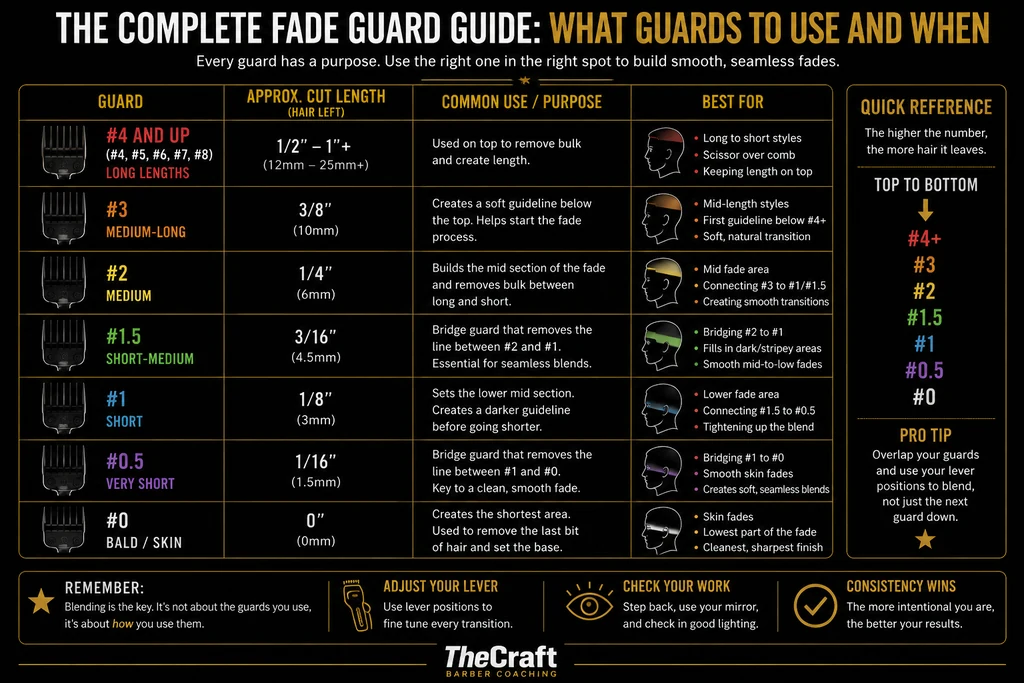
TheCraft reference chart titled The complete fade guard guide: what guards to use and when, noting that every guard has a purpose and the right one in the right spot builds smooth, seamless fades. A table lists each guard with its approximate cut length, common use, and what it is best for. Guard number four and up, covering guards four through eight, leaves half an inch to over an inch, roughly 12 to 25 millimetres or more; it is used on top to remove bulk and create length, and suits long to short styles, scissor over comb, and keeping length on top. Guard number three leaves three eighths of an inch, about 10 millimetres; it creates a soft guideline below the top and helps start the fade, suiting mid-length styles, the first guideline below the number four and up, and soft natural transitions. Guard number two leaves a quarter inch, about 6 millimetres; it builds the mid section of the fade and removes bulk between long and short, suiting the mid fade area, connecting the number three to the number one or one and a half, and creating smooth transitions. Guard number one and a half leaves three sixteenths of an inch, about 4.5 millimetres; it is a bridge guard that removes the line between the number two and the number one and is essential for seamless blends, suiting bridging two to one, filling in dark or stripey areas, and smooth mid-to-low fades. Guard number one leaves an eighth of an inch, about 3 millimetres; it sets the lower mid section and creates a darker guideline before going shorter, suiting the lower fade area, connecting one and a half to zero point five, and tightening up the blend. Guard number zero point five leaves a sixteenth of an inch, about 1.5 millimetres; it is a bridge guard that removes the line between the number one and the number zero and is key to a clean, smooth fade, suiting bridging one to zero, smooth skin fades, and soft seamless blends. Guard number zero leaves zero inches; it creates the shortest area and is used to remove the last bit of hair and set the base, suiting skin fades, the lowest part of the fade, and the cleanest sharpest finish. A quick reference panel states that the higher the number, the more hair it leaves, and lists the guards from top to bottom in order: number four and up, three, two, one and a half, one, zero point five, and zero. A pro tip advises overlapping your guards and using your lever positions to blend, not just the next guard down. Closing reminders: blending is the key and it is not about the guards you use but how you use them; adjust your lever to fine tune every transition; check your work by stepping back, using your mirror, and checking in good lighting; and consistency wins, because the more intentional you are, the better your results.View full size

What does the lever do?

On an adjustable clipper, the lever changes the blade relationship and therefore the effective cutting length.

Barbers commonly describe positions as:

  • Closed
  • Partially open
  • Halfway
  • Open

But these aren’t laboratory measurements.

“Halfway” is a practical barber reference, and the exact length depends on the clipper.

The lever gives you intermediate steps between larger changes in guard length.

That’s extremely useful for removing guidelines and refining transitions.

Why half guards matter

A half guard or other intermediate guard can bridge a gap that would otherwise be difficult to blend cleanly.

For example, if one setting isn’t affecting a line but the next shorter setting removes too much hair, an intermediate combination may give you the control you need.

This is why understanding the relationship between guard + lever + blade is more valuable than simply memorizing a sequence.
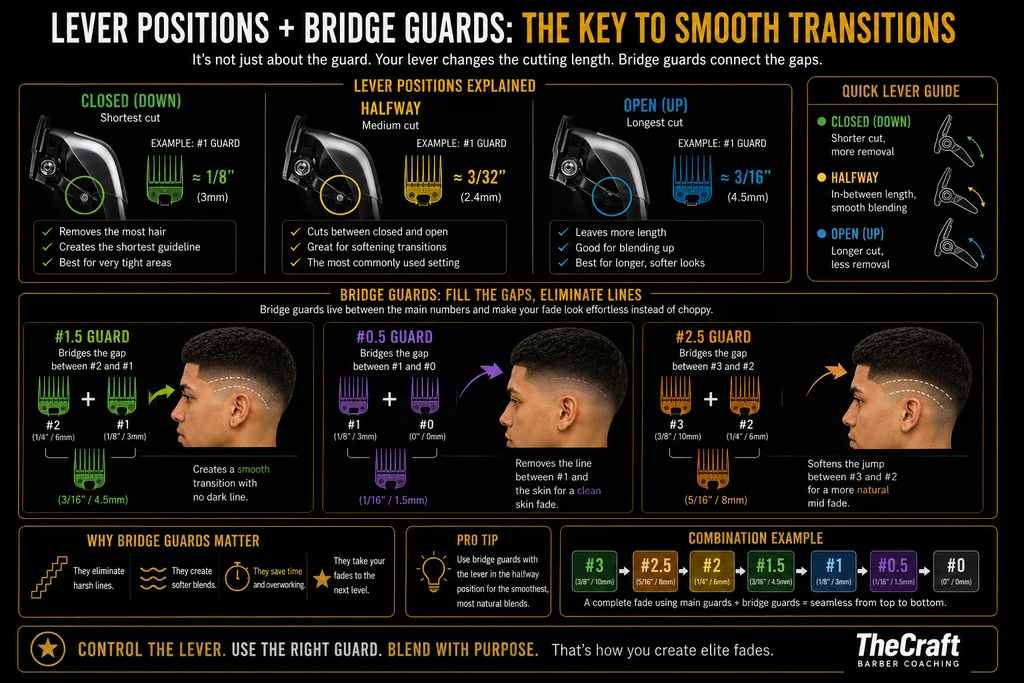
TheCraft diagram titled Lever positions plus bridge guards: the key to smooth transitions, explaining that it is not just about the guard, because your lever changes the cutting length and bridge guards connect the gaps. Lever positions explained, each shown with a close-up of the clipper lever. Closed, meaning down, is the shortest cut: with a number one guard it leaves roughly an eighth of an inch, about 3 millimetres. It removes the most hair, creates the shortest guideline, and is best for very tight areas. Halfway is the medium cut: with a number one guard it leaves roughly three thirty-seconds of an inch, about 2.4 millimetres. It cuts between closed and open, is great for softening transitions, and is the most commonly used setting. Open, meaning up, is the longest cut: with a number one guard it leaves roughly three sixteenths of an inch, about 4.5 millimetres. It leaves more length, is good for blending up, and is best for longer, softer looks. A quick lever guide repeats that closed means a shorter cut with more removal, halfway gives an in-between length with smooth blending, and open gives a longer cut with less removal. A section on bridge guards, headed fill the gaps and eliminate lines, explains that bridge guards live between the main numbers and make your fade look effortless instead of choppy. The number one and a half guard bridges the gap between the number two at a quarter inch or 6 millimetres and the number one at an eighth of an inch or 3 millimetres, sitting at three sixteenths of an inch or 4.5 millimetres, and creates a smooth transition with no dark line. The number zero point five guard bridges the gap between the number one at an eighth of an inch or 3 millimetres and the number zero at zero, sitting at a sixteenth of an inch or 1.5 millimetres, and removes the line between the number one and the skin for a clean skin fade. The number two and a half guard bridges the gap between the number three at three eighths of an inch or 10 millimetres and the number two at a quarter inch or 6 millimetres, sitting at five sixteenths of an inch or 8 millimetres, and softens the jump between the number three and the number two for a more natural mid fade. Each is illustrated on a side profile with a dashed line marking where the bridge sits. Why bridge guards matter: they eliminate harsh lines, they create softer blends, they save time and overworking, and they take your fades to the next level. Pro tip: use bridge guards with the lever in the halfway position for the smoothest, most natural blends. A combination example shows a complete progression from the number three at three eighths of an inch or 10 millimetres, to two and a half at five sixteenths or 8 millimetres, to two at a quarter inch or 6 millimetres, to one and a half at three sixteenths or 4.5 millimetres, to one at an eighth or 3 millimetres, to zero point five at a sixteenth or 1.5 millimetres, to zero at zero, noting that a complete fade using main guards plus bridge guards is seamless from top to bottom. The closing line reads control the lever, use the right guard, blend with purpose — that is how you create elite fades.View full size

Think in transitions, not recipes

Beginning barbers often search for the perfect formula:

“Use this guard, then this guard, then this guard.”

A system is helpful for consistency.

But eventually you need to understand what each tool is doing.

Instead of asking only:

“What guard comes next?”

Ask:

  • “What length is here?”
  • “What length is above it?”
  • “What tool or setting bridges those two?”

That mindset makes it easier to troubleshoot a fade when the normal recipe doesn’t work perfectly.

A simple conceptual fade progression

A fade generally moves from shorter hair into progressively longer hair.

Your workflow might involve:

  1. 1.Establishing the overall shape and desired fade height
  2. 2.Creating or identifying the shortest area
  3. 3.Establishing the next length
  4. 4.Using intermediate blade/lever/guard settings to soften the transition
  5. 5.Continuing into longer guards or bulk-removal techniques
  6. 6.Refining remaining lines and dark areas

The exact order varies by barber.

  • Some fade upward.
  • Some debulk first.
  • Some create guidelines.
  • Some use fewer visible guidelines.

There is no reason to pretend only one system works.

The important part is understanding the lengths you’re creating.
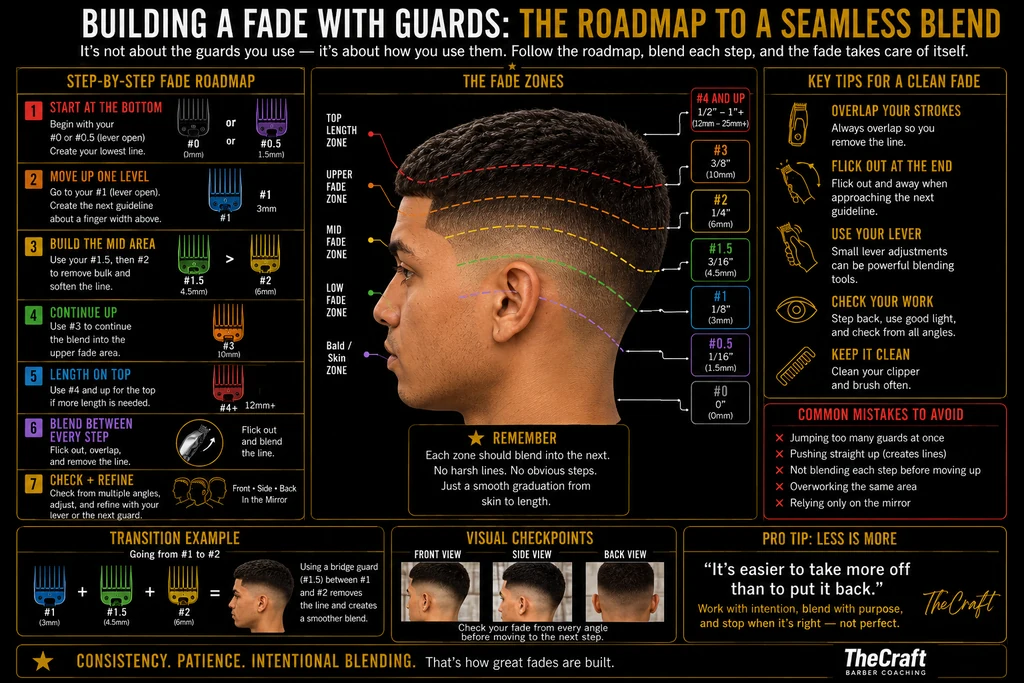
TheCraft diagram titled Building a fade with guards: the roadmap to a seamless blend, noting it is not about the guards you use but how you use them, and that if you follow the roadmap and blend each step the fade takes care of itself. A step-by-step fade roadmap runs through seven stages. Step one, start at the bottom: begin with your number zero, or your number zero point five with the lever open, and create your lowest line. Step two, move up one level: go to your number one with the lever open and create the next guideline about a finger width above. Step three, build the mid area: use your number one and a half, then your number two, to remove bulk and soften the line. Step four, continue up: use your number three to continue the blend into the upper fade area. Step five, length on top: use a number four and up for the top if more length is needed. Step six, blend between every step: flick out, overlap, and remove the line. Step seven, check and refine: check from multiple angles — front, side, back, and in the mirror — adjust, and refine with your lever or the next guard. A central photograph of a finished fade in profile maps the fade zones with coloured dashed guidelines. The top length zone uses a number four and up, leaving half an inch to over an inch or 12 to 25 millimetres and more. The upper fade zone uses a number three at three eighths of an inch or 10 millimetres. The mid fade zone uses a number two at a quarter inch or 6 millimetres, and a number one and a half at three sixteenths of an inch or 4.5 millimetres. The low fade zone uses a number one at an eighth of an inch or 3 millimetres. The bald or skin zone uses a number zero point five at a sixteenth of an inch or 1.5 millimetres down to a number zero at zero. A reminder states that each zone should blend into the next, with no harsh lines and no obvious steps, just a smooth graduation from skin to length. Key tips for a clean fade: overlap your strokes so you always remove the line; flick out at the end, flicking out and away when approaching the next guideline; use your lever, since small lever adjustments can be powerful blending tools; check your work by stepping back, using good light, and checking from all angles; and keep it clean by cleaning your clipper and brushing often. Common mistakes to avoid: jumping too many guards at once, pushing straight up which creates lines, not blending each step before moving up, overworking the same area, and relying only on the mirror. A transition example shows going from the number one at 3 millimetres to the number two at 6 millimetres using a number one and a half bridge guard at 4.5 millimetres in between, which removes the line and creates a smoother blend. Visual checkpoints show front, side, and back views, advising you to check your fade from every angle before moving to the next step. A pro tip headed less is more quotes that it is easier to take more off than to put it back, and advises working with intention, blending with purpose, and stopping when it is right, not perfect. The closing line reads consistency, patience, intentional blending — that is how great fades are built.View full size

When should you use a shorter guard?

Use a shorter setting when the hair you’re targeting is genuinely too long for the transition you’re trying to create.

Don’t choose it simply because an area looks dark.

Check density, growth, and head shape first.

When should you use a larger guard?

Larger guards help control and transition longer areas, especially higher in the fade.

They can also help remove excess bulk without immediately taking the section too short.

Depending on the haircut, clipper-over-comb or shear work may become more appropriate as you move into longer hair.

Guard control matters as much as guard selection

Two barbers can use the same guard and get different results.

Pay attention to:

  • How much pressure you’re using
  • Whether the blade is flat or leaving the head
  • Your flicking motion
  • Whether you’re using the full blade or corner
  • The direction of hair growth
  • How high you’re carrying each section

Why it matters

Your guard doesn’t create the blend by itself. You do.

Key takeaway

  • Don’t memorize guards without understanding their purpose.
  • Learn how your specific clipper, blade, guards, and lever positions interact.
  • Then use them to solve the transition in front of you rather than forcing every haircut through the exact same formula.

Frequently asked questions

What guards do I need to do a fade?

The exact set depends on your clipper system and the fade you’re creating, but barbers commonly work with the blade/no-guard range plus several guards and intermediate sizes. Learn the specific cutting lengths and behavior of your equipment.

What does opening the lever do?

On an adjustable clipper, opening the lever generally increases the effective cutting length compared with the closed position. Exact differences vary by clipper and blade.

Do I need a half guard?

Intermediate guards such as a half guard can make certain transitions easier because they bridge gaps between other settings. Whether one is necessary depends on your clipper system and fading method.

What order should I use my guards?

There is no single mandatory order. Many barbers use a repeatable system, but the larger goal is connecting shorter and longer sections smoothly. Learn what each setting does so you can adjust when a haircut doesn’t follow the expected formula.

Why does the same guard cut differently on different clients?

Hair texture, density, growth direction, head shape, how the hair enters the guard, and your technique can all change the visual result.

Related guides