What is a weight line in a fade?
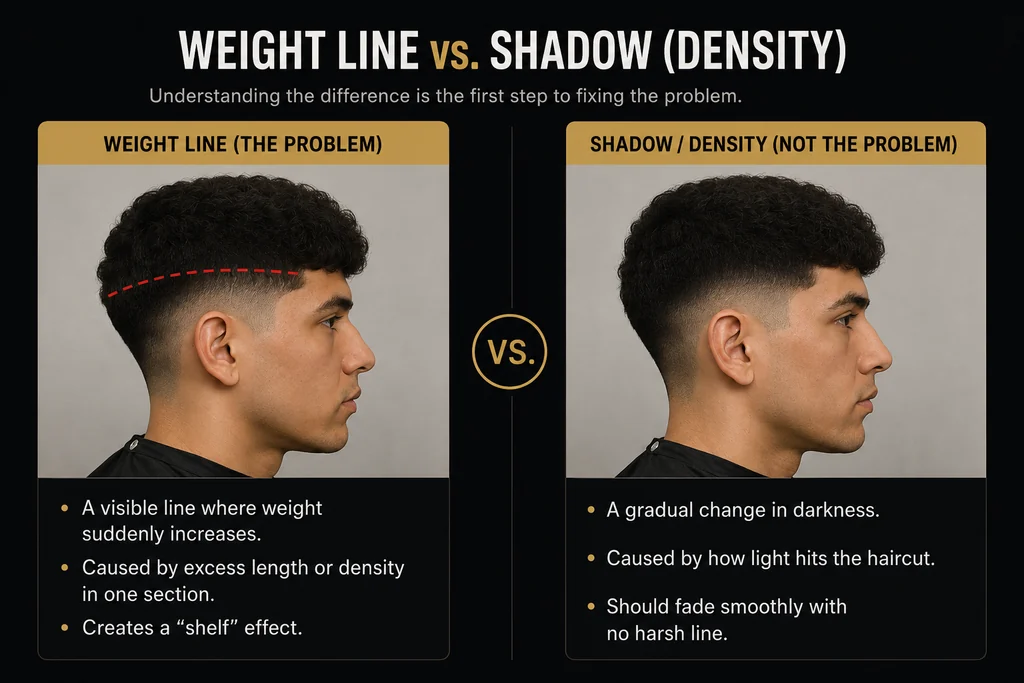
A weight line is an area where the haircut stops transitioning smoothly and a visible band of darker or heavier hair remains.
Instead of the fade gradually moving from shorter hair into longer hair, your eye catches a distinct horizontal or curved area of density.
Weight lines commonly appear:
- Around the parietal ridge
- Near the transition between shorter guards and longer guards
- Behind the ear
- Around the occipital area
- Where clipper work transitions into clipper-over-comb or shear work
The important thing to understand is that a dark area is not automatically a weight line.
Hair density, growth direction, lighting, head shape, and natural color variation can all make an area appear darker.
Before removing more hair, determine whether you’re actually seeing excess length.
 View full size
Why do weight lines happen?
1. The transition between lengths is too abrupt
If one section is significantly shorter than the section directly above it, the eye sees a band instead of a gradual transition.
2. A guideline wasn’t completely blended
Creating guidelines can make a fade easier to organize, but each guideline needs to be softened before the haircut is finished.
3. The wrong guard is being used for the problem
A common beginner mistake is seeing darkness and immediately reaching for a shorter guard.
That can move the problem higher rather than eliminating it.
Why it matters
Your goal isn’t simply to make the dark area shorter. Your goal is to create a smooth transition between the lengths above and below it.
4. Too much bulk remains near the ridge
The head begins curving away around the parietal ridge. If too much weight remains there, a shelf-like line can appear.
Depending on the haircut, clipper-over-comb, a larger guard, shear-over-comb, or another controlled blending technique may be more appropriate than continuing upward with a short guard.
5. Head shape and growth pattern are being ignored
The same guard does not visually produce the same result everywhere on every head.
Whorls, dents, protrusions, changes in density, and directional growth affect how light hits the haircut.
That is why fading should be visual as well as mechanical.
How to remove a weight line
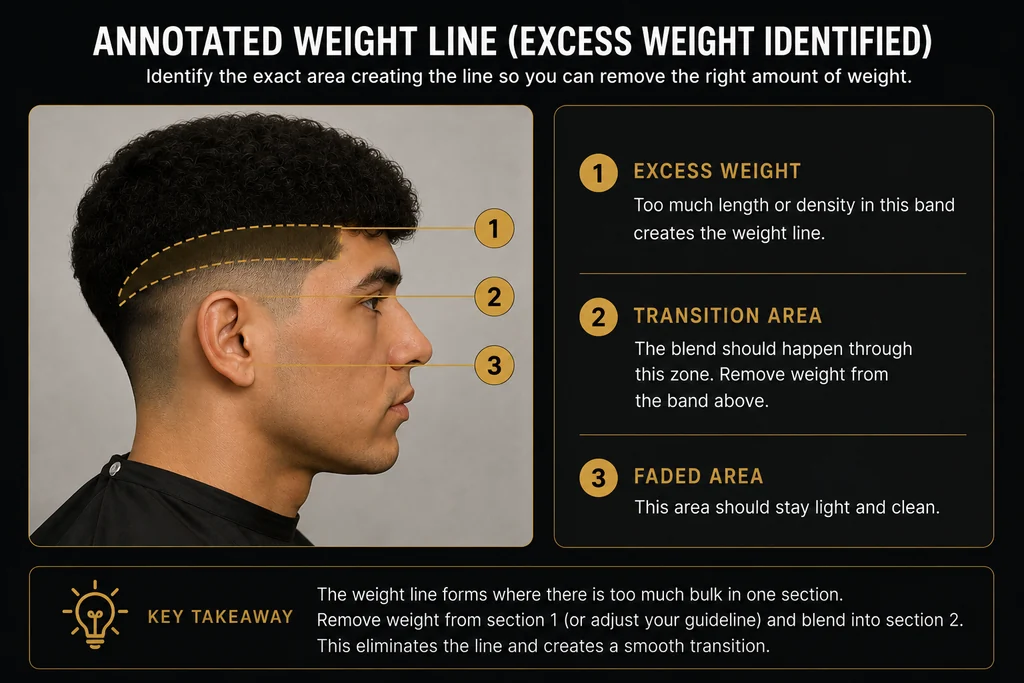
Step 1: Stop cutting and identify the actual problem
Before changing guards, brush or comb the hair into its natural position.
Look at the area from the front, side, rear, and at a slight angle if possible.
Ask yourself:
- Is this area actually longer?
- Is this a shadow?
- Is the hair denser here?
- Does the head shape change here?
- Is the line coming from the section above or below?
This prevents you from chasing shadows and unnecessarily removing hair.
 View full size
Step 2: Identify the lengths surrounding the line
Determine what you used immediately below and above the problem area.
The correct cutting length or setting is often somewhere between those two stages.
For example, if the problem exists between two guard stages, revisit the intermediate guard or lever position instead of jumping straight to the shorter setting.
Guard numbering and exact cutting lengths can differ by clipper brand, so focus on the transition rather than memorizing one universal formula.
Step 3: Start conservatively
Begin with the least aggressive guard or lever setting likely to reduce the excess weight.
Watch out
You can always remove more hair. Putting hair back isn’t an option.
This is particularly important near the upper portion of a fade, where going too short can push the fade higher and change the intended shape.
Step 4: Use controlled strokes
Avoid digging the entire blade into one dark area.
Depending on the section and technique, use:
- A light flicking motion
- The corner of the blade for precision
- Small controlled strokes
- Clipper-over-comb for excess bulk
- Shear-over-comb where appropriate
Work gradually.
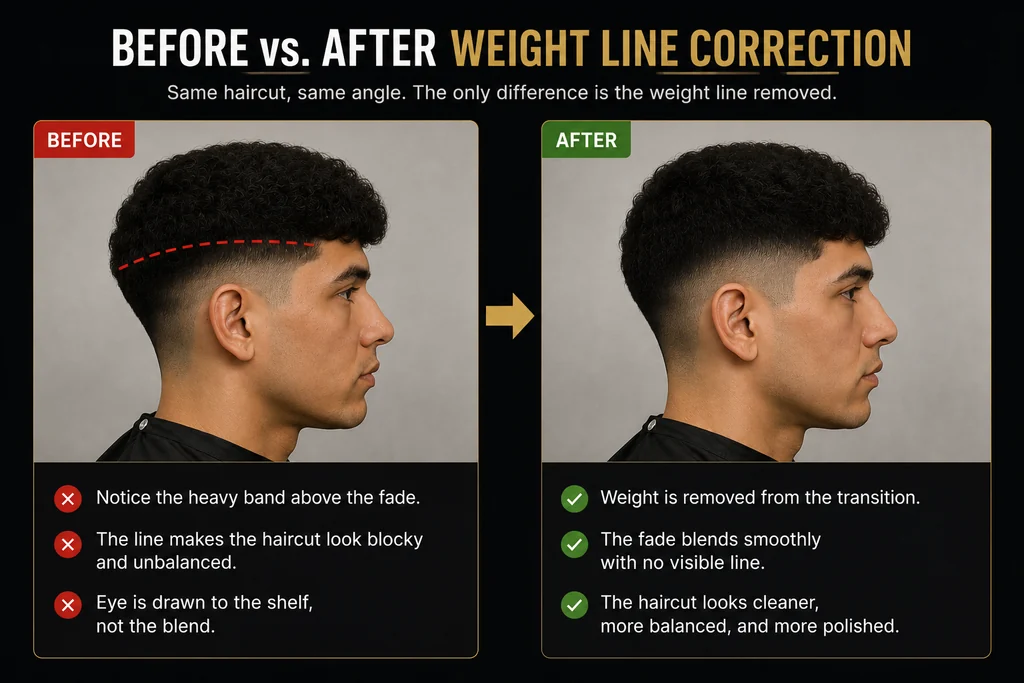
The goal is to soften the transition, not carve another guideline.
 View full size
Step 5: Brush and reassess constantly
Loose hair can make a blend look darker than it actually is.
After several passes:
- Brush the area.
- Step back.
- Change your viewing angle.
Then decide whether another pass is necessary.
Step 6: Check the fade at normal viewing distance
Barbers spend much of the haircut inches away from the client’s head.
Clients don’t.
Step back and look at the overall silhouette and transition.
A section that looks dramatic from six inches away may disappear at normal viewing distance. The opposite can also happen: a line you missed up close becomes obvious when you step back.
Don’t chase every dark area
One of the fastest ways to damage a good fade is trying to make every part of the head exactly the same shade.
Hair isn’t a flat surface. Density, growth direction, head shape, and lighting all change across a single head, and each of them changes how dark a section reads. The objective is a visually smooth transition, not identical brightness everywhere.
Telling the two apart
This is a weight line
The heavy band sits at a consistent height, follows the path of a guard or an unblended guideline, and stays exactly where it is when you brush the hair, step back, or move the light.
This is not a weight line
The dark area softens, shifts, or disappears when you brush the hair, change your angle, or change the direction of the light. That is density, growth direction, or shadow — and cutting into it will leave a hole.
Check the area from more than one angle
Before deciding a section needs more work, look at it from:
- Left side
- Right side
- Back
- Front/temple area where relevant
- Three-quarter angles
Change the direction of the light when you can. An area that looks like a blending problem from one position may reveal itself as density or shadow from another.
Still can’t tell what’s causing the line?
This is where generic fade tutorials have a limitation: they can show you how somebody else completed a fade, but they can’t necessarily tell you what is happening in your haircut.
Key takeaway
- When you see a weight line, don’t automatically attack it with a shorter guard.
- Identify why the area looks heavy, determine the lengths surrounding it, start conservatively, blend gradually, and keep reassessing the haircut from multiple angles.
- The better you become at diagnosing the cause of a line, the less time you’ll spend chasing the blend.
Frequently asked questions
What guard removes a weight line?
There isn’t one universal guard that removes every weight line. The correct choice depends on the lengths above and below the line, your clipper system, lever position, and where the weight sits. Start with the least aggressive option likely to soften the transition.
Why does my fade still have a line after blending?
The remaining line may be caused by excess length, an unfinished guideline, bulk higher in the haircut, hair density, growth direction, head shape, or even lighting. Brush the hair and inspect it from multiple angles before removing more.
Should I use the corner of my clipper blade?
Using the corner of the blade can give you more precision when targeting a small area, but blade control matters. Use light, controlled strokes rather than repeatedly digging into the same section.
Why do I keep pushing my fades too high?
One common reason is repeatedly using shorter guards higher on the head while chasing dark areas. Start conservatively and determine whether the darkness is actually caused by excess length before removing more hair.